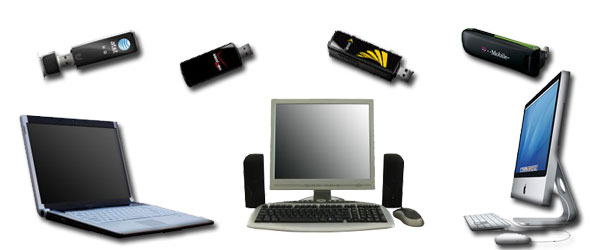
Works With Windows XP, Vista, Windows 7 & Mac OS X
They’re plenty reasons for wanting to share mobile broadband.
Whether it’s just getting another laptop online, juicing up your Playstation 3 with some much needed internet or jamming on Xbox Live, you need to get internet from point A to point B.
While the 1st steps are practically identical I’ve grabbed the best tutorials around, put together screenshots and thrown in videos to show you how to share mobile broadband with any Laptop, PC or Mac.
Use the jumplist above to hop over to whichever you need to do:
1. I’m Using Windows & Need To Share With Another Computer
2. I’m Using a Mac & Need To Share With Another Computer
Got a Xbox 360 or Playstation 3?
Try one of these tutorials:
Share Mobile Broadband With Your Xbox 360 To Get on Xbox Live

There are 3 ways to share mobile broadband to another laptop or PC:
- 1. Via Ethernet cable (Stable connection for sharing with a single other laptop / PC)
- 2. Via Ethernet cable plugged into a Wireless Router (Best for a more permanent setup)
- 3. Via an adhoc WiFi network (okay for occasional sharing. Least stable of the three)
The beginning steps are fundamentally the same for Windows XP, Vista and Windows 7.
Towards the end, the steps differ slightly. Screenshots are provided to illustrate the differences (along with jumplinks to get to relevant sections when needed).
While the OS below is Vista, the steps are practically identical for Windows 7 and very similar for Windows XP. For now, let’s start with what you’ve got to do regardless of which configuration you’re going for (specific setup steps come a little later):
1. Click on Start Button

2. Control Panel
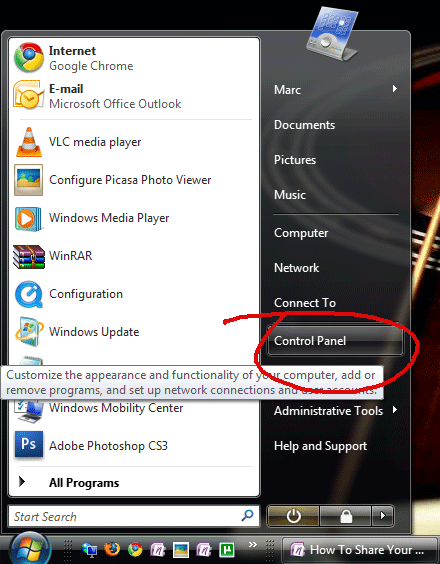
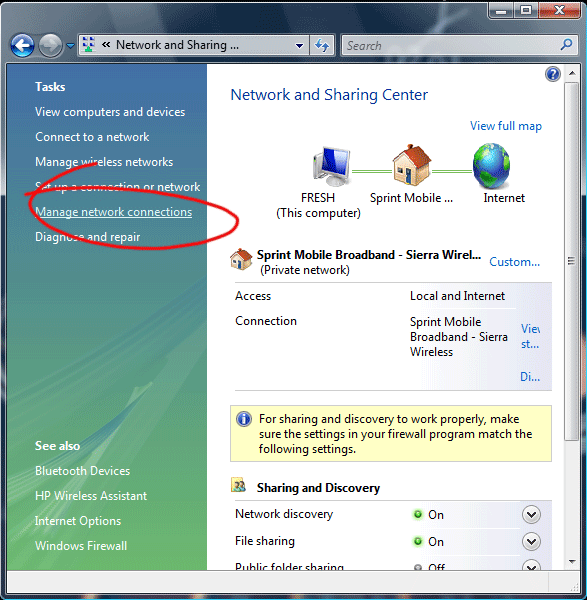
3. (search for Network) click on Network and Sharing Center

4. Under tasks, click on Manage Network Connections (not to be confused with manage wireless networks)
5. Locate your mobile broadband adapter’s connection and ‘right click’ it
6. Click Properties
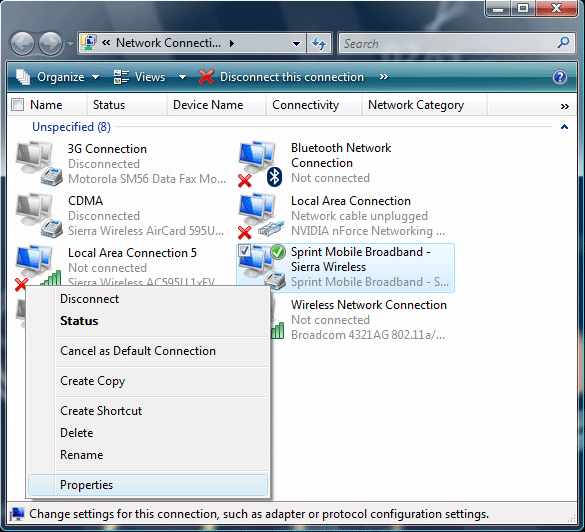
7. Click on the Sharing Tab
This Is Where The Steps Switch Up Depending On Which Setup You Want
For the continuing steps, click whichever setup you’re putting together and it’ll walk you through finishing up:
1. Wired Via Ethernet cable (From one laptop to the next).

The setup for sharing via ethernet & sharing via ethernet into a wireless router differ in only the final step. Instead of plugging the cable into a second laptop or PC, you simply plug it into your wireless router to broadcast the connection via WiFi.
Continuing from where we left off:
8. Check the box “Allow other users to connect through this computer’s connection”
9. There should be a drop down box that lets you select the Local Area Connection (it will appear in the ‘home networking connection’ box below that has wireless network connection. Click ok twice (until boxes are gone).

10. To start using the connection you’ll need to close your mobile broadband connection and then restart it.
11. Plug the ethernet cable into the second computer and start browsing the net.
Extra step for Wireless Routers:
*11. Plug the ethernet cable into the ‘internet’ socket of your wireless router to begin broadcasting the connection via WiFi.
One caveat to this method is that it requires that your laptop be ‘on’ to use the connection. If that’s not your cup of tea, then you may want to check out a personal hotspot like the Sprint or Verizon MiFi (it broadcasts its 3G connection via a built-in WiFi radio)
Found this article helpful?

Like this article? It’s part of the free “Mobile Broadband Buyer’s Guide”.

It’s part of the free “Mobile Broadband Buyer’s Guide“.
If you haven’t signed up already, take 30 seconds and do it now. Rather than doing it yourself, take a guided tour through essentials of mobile broadband. It’ll save you time, money all while avoiding buyer’s remorse.
Sure you could search yourself but do you really wanna go through 180+ pages?
Check out the Mobile Broadband E-Course Syllabus & sign up here.
.

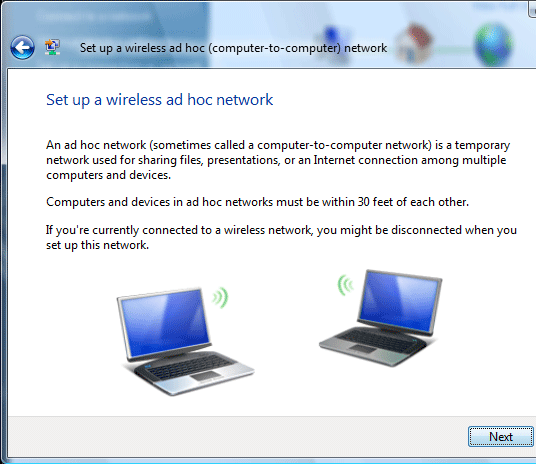
An adhoc WiFi connection isn’t the same as a regular WiFi connection. As such, some devices (notably WiFi enabled smartphones) may not be able to detect the network to connect. Laptops, however, don’t usually have much of a problem.
8. Check the box “Allow other users to connect through this computer’s connection”
9. There should be a drop down box that lets you select the Wireless Connection as the way you wish to share. Click ok twice (until boxes are gone)
*phew…breathe if you’ve come this far. Might not take long but it feels that way typing this.
10. Return to the Network and Sharing Center.
11. In the left hand column under Tasks, select “Set up a connection or network”.

12. Click Setup a Wireless Ad Hoc (Computer to Computer) network
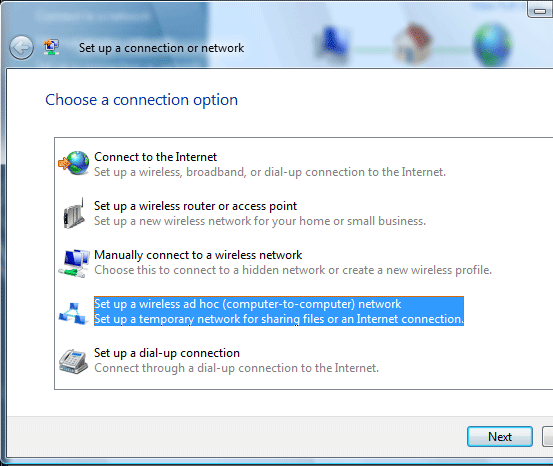
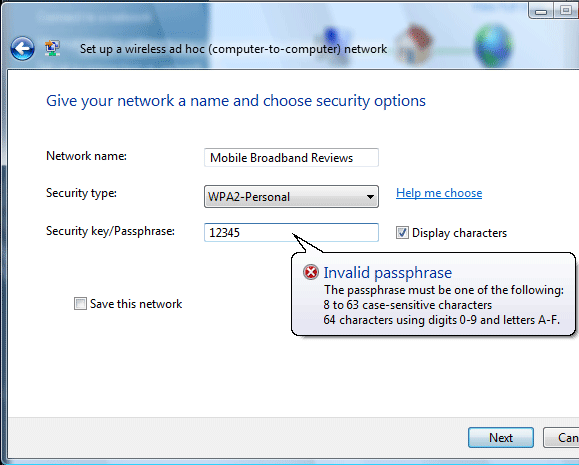
13. Give it a name
14. Select form of encryption. Can be anything but for sake of security let’s say it’s WPA2-Personal. If you choose it to be so, it must be a 8 characters or more. Let’s make one up (please be more creative than I was).

15. Back to Network and Sharing Center. Click on manage wireless networks. You should see the network you created. If it says waiting on users to connect…then your friend’s laptop should be able to see it, put in the password and hop on.

If it can’t see it, then double click the ad hoc network on your computer to “connect to it” (activating it) then see if she can see it. Also, if it’s not working, you may need to disconnect the broadband adapter and reconnect it.
And there you have it. You’re good to go.
I’ve found this to be really helpful if I have a friend come over. I usually have one setup and share the password with them. For them, it’s just like looking for a WiFi network.
What’s great about it is that it’s actually a bit safer than WiFi because the area that your laptop can broadcast is much smaller (about the size of a living room). In other words, snoopers from the street or next door can’t sniff out your connection.
Found this article helpful?
Like this article? It’s part of the free “Mobile Broadband Buyer’s Guide”.
It’s part of the free “Mobile Broadband Buyer’s Guide“.
If you haven’t signed up already, take 30 seconds and do it now. Rather than doing it yourself, take a guided tour through essentials of mobile broadband. It’ll save you time, money all while avoiding buyer’s remorse.
Sure you could search yourself but do you really wanna go through 180+ pages?
Check out the Mobile Broadband E-Course Syllabus & sign up here.
.
1. Connect the second laptop / PC / Mac via an Ethernet cable.
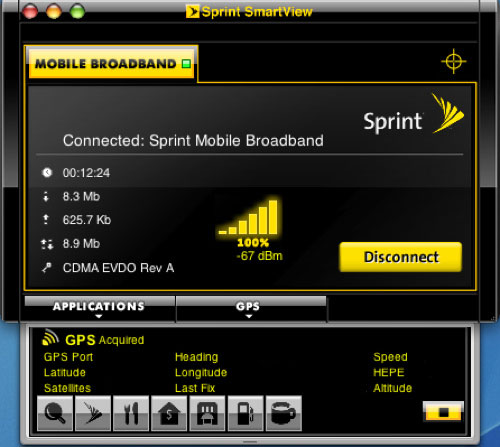
2. Start your mobile broadband connection (pictured below is the Sprint Smartview connection, while your manager may differ depending on your carrier, it’s no biggie).
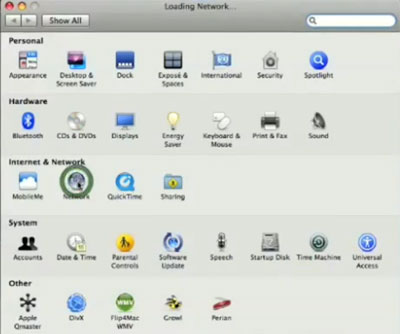
3. Click on System Preferences and then click ‘Network’ under ‘Internet & Network’ settings.
4. Next, select your mobile broadband connection and ensure that it’s connected. After that, select the ethernet connection.


5. Click the ‘Configure’ and select ‘Using DHCP with manual address’. Set the IP Address to 10.0.0.1

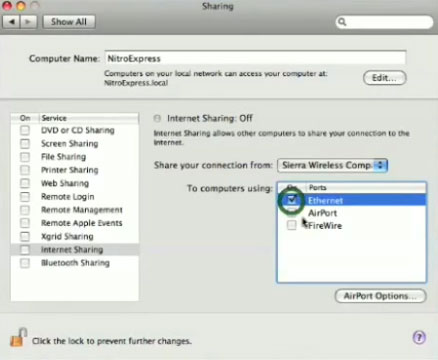
6. Hit the back button (upper left corner) and then select ‘sharing’ under ‘Internet & Network’ settings.

7. Highlight ‘Internet Sharing’ in the left column (check if it’s not already checked to enable it after choosing your settings in the next step).

8. Choose how you’d like to share your connection (i.e. AirPort for wireless, Ethernet for wired). For this tutorial, it will be Ethernet.
9. That’s it.
10. Test the connection on the 2nd computer and start browing the net. If it doesn’t work immediately you may need to restart your mobile broadband connection.
Found this article helpful?
Like this article? It’s part of the free “Mobile Broadband Buyer’s Guide”.
It’s part of the free “Mobile Broadband Buyer’s Guide“.
If you haven’t signed up already, take 30 seconds and do it now. Rather than doing it yourself, take a guided tour through essentials of mobile broadband. It’ll save you time, money all while avoiding buyer’s remorse.
Sure you could search yourself but do you really wanna go through 180+ pages?
Check out the Mobile Broadband E-Course Syllabus & sign up here.
.
Mark says:
Doesnt work with vodaphone USB and Macbook to ipod touch 4. If anyones got some suggestions!?!?
Marc says:
Hi Mark,
I’d recommend calling Vodaphone to see if they can help out. I’m US-based and don’t have much experience with the devices and carriers across the pond. Hope this helps
Lowell Mills says:
Marc, I’ve got mobile broadband working fine, tethering my Verizon cell phone with VZAccess Manager to my MacBook Pro (OS 10.6.7).
Once I’m connected, I configure the ethernet connection to “Using DHCP with manual address” and 10.0.0.1 and deleted the DNS Server entries and hit Apply. At this point the left side of the Network window shows I’m connected via my cell phone but Ethernet still shows “Not Connected.”
Back on the Sharing Sys Pref window, it says to “Share your connection from Qualcomm CDMA Technologies MSM” To computers using “Airport.” How can I add a port, specifically ethernet? I thought it would automatically show me all options. I can get Ethernet to show as a port but only when I’m disconnected from VZAccess Manager…
Many thanks in advance if you can shed any light on this… Lowell Mills
Minneapolis Anoka County Coon Rapids rent to own says:
Hey! I simply wish to give an enormous thumbs up for the nice info you’ve got right here on this post. I can be coming again to your blog for extra soon.